Composition
Using Symmetry and Patterns in Your Photos
Learn how to use symmetry and patterns in photography to create stronger, more compelling images. Practical tips for beginners with any camera.
Symmetry and patterns are two of the fastest ways to make a photo feel satisfying to look at. Our brains are wired to find order in visual chaos, so when a frame shows perfect reflection or a repeating shape, viewers naturally slow down and pay attention. This guide walks you through what both concepts mean, how to spot them, and how to use them deliberately.
What Is Symmetry in Photography?
Symmetry in photography means the image can be split along a line (or a central point) and both halves mirror each other closely. There are two main types beginners encounter:
Reflective symmetry (also called bilateral symmetry) is the most common. Draw an imaginary line down the middle of your frame, and both sides are rough mirrors of each other. Think of a cathedral's facade, a long corridor, or a calm lake reflecting the treeline above it.
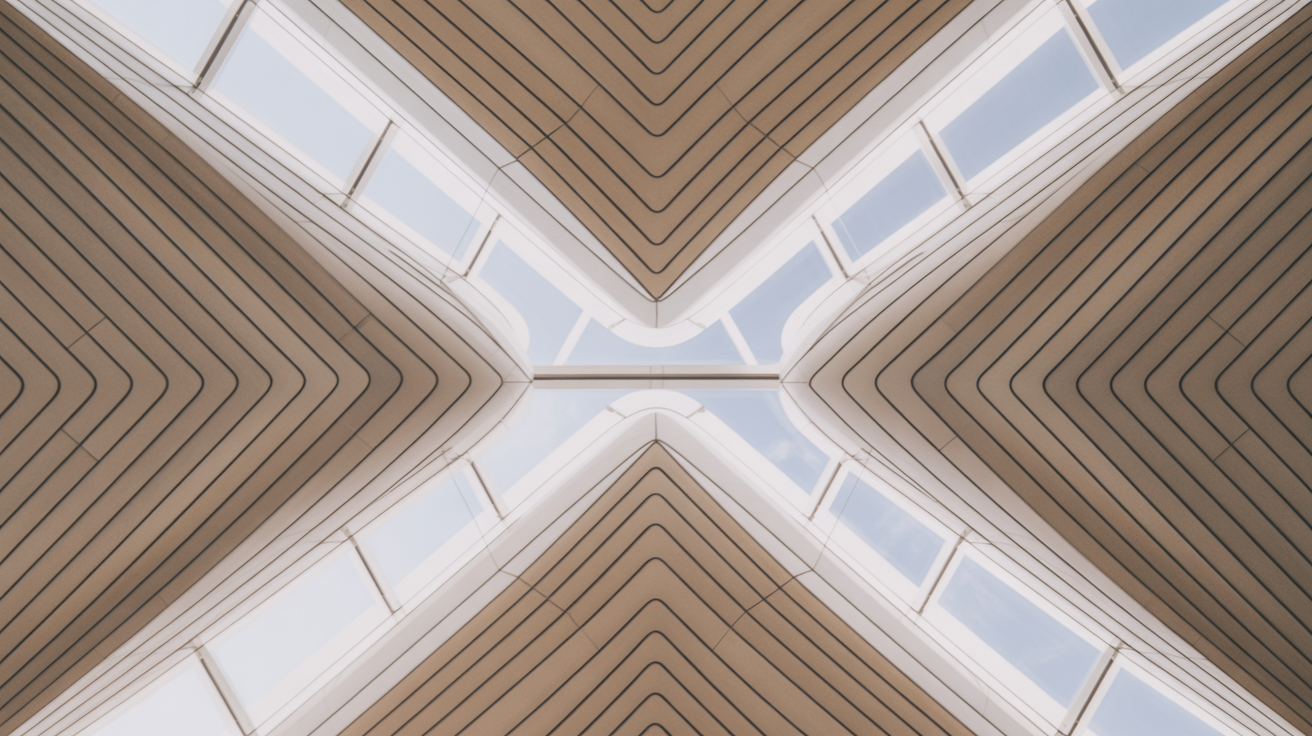
Radial symmetry spreads outward from a central point, like the spokes of a wheel, the petals of a flower, or a spiral staircase shot from directly below. These tend to feel more dynamic than left-right symmetry because the eye travels in circles rather than bouncing side to side.
Neither type requires a fancy camera. A phone camera shot straight down a tiled hallway can produce a stronger symmetrical composition than a DSLR pointed carelessly at the same subject.
What Are Patterns in Photography?
A pattern in photography is any repeated element across the frame: rows of windows on a building, identical fence posts, cobblestones, or tiles on a wall. Patterns feel satisfying for the same reason symmetry does, but they carry an additional advantage: you can break them.
A single red chair among rows of grey chairs becomes the focal point instantly. A crack in an otherwise perfect brick wall catches the eye. Photographers call this a pattern interrupt, and it gives the viewer a place to land after scanning the repetition. Without the pattern, that one red chair is just a chair. Within the pattern, it becomes the story.
How to Find Symmetry and Patterns
You do not need to travel far to find compelling subjects. Here are reliable starting points:
- Architecture: Look straight down hallways, archways, and bridges. Shoot from dead center.
- Reflections: Still water, polished floors, and glass facades create natural mirrors. Position yourself so the reflected and real elements divide the frame roughly in half.
- Nature: Leaves, flowers, seed pods, and spider webs all carry radial or bilateral symmetry. Get close.
- Urban grids: Parking structures, staircases, scaffolding, and market stalls repeat structure constantly.
- Look up and look down: Symmetry is often above you (a skylight, a dome) or below you (patterned tiles, leaf litter) rather than at eye level.
When you walk into a new space, pause before raising the camera. Ask: is there a repeating element here? Is there a center axis I can align with?
How to Shoot Symmetrical Compositions
Getting symmetry right is mostly about positioning, not settings.
- Find the center axis. Before you frame the shot, physically move until you are standing directly in front of or above the central line of the scene. Even a slight off-center position breaks the mirror effect.
- Use your camera's grid overlay. Most phones and cameras let you display a grid on the screen. Turn it on. Line up your center vertical or horizontal guideline with the axis of your subject.
- Shoot from eye level or switch deliberately. Shooting a corridor from eye level gives a different feel than crouching low or standing on a step. Try all three positions before you leave the spot.
- Level the horizon. For reflections especially, a tilted horizon destroys the illusion of a perfect mirror. Use the electronic level if your camera has one, or straighten it later in editing.
- Take the "boring" shot first. Nail the clean, centered, symmetrical frame before you start experimenting. You can always crop or tilt later; you cannot uncrop a frame you never took.
For patterns, you do not need to center the frame the same way. Instead, think about whether the pattern fills the entire frame (edge to edge) or anchors one part of it while something else draws the eye. Both approaches work, but they create different feelings. An edge-to-edge pattern feels abstract and textural. A partial pattern with a subject in front of it tells more of a story.
Breaking Symmetry on Purpose
Flawless symmetry can feel a little sterile if nothing disrupts it. Once you have the clean shot, look for ways to introduce a small element of imperfection:
- A person walking through an otherwise empty corridor
- One slightly different tile in a repeating floor
- A reflection that catches a detail the real side does not
Placing a subject slightly off the center line of a symmetrical scene is a useful hybrid technique. The symmetry provides the visual structure; the off-center subject gives the viewer a destination. This connects to ideas covered in the rule of thirds and when to break it, where small deviations from a perfect grid create more visual tension than the grid alone.
Combining Symmetry with Other Composition Tools
Symmetry and patterns work well alongside other techniques:
Leading lines can reinforce symmetry by converging toward a vanishing point at the center of the frame. A road, a row of trees, or a canal can do double duty as both a leading line and an axis of symmetry. For more on using lines, see how to use leading lines in photography.
Natural frames can surround a symmetrical subject and give the image depth. An archway framing a reflective pool is a simple example. If you want to experiment with that layering technique, framing in photography using natural frames walks through how to find and use them.
You do not need to use all these tools at once. Start with one, get comfortable, then add a second layer when the scene calls for it.
Frequently Asked Questions
Do I need a special lens to shoot symmetry? No. A standard kit lens or phone camera is fine. The key is your position and angle, not the focal length. Wide lenses do exaggerate perspective and can make corridor shots feel deeper, but they are not required.
What camera settings should I use for symmetry and pattern shots? There is no single answer, because symmetry and patterns appear in all kinds of light. In good light, your camera's auto mode or aperture-priority mode will handle exposure well. In low light (indoors, tunnels), you may need to raise ISO or use a tripod. The composition matters far more than the exposure settings for this type of shot.
Why does my symmetry shot look slightly off even though I tried to center it? Two common causes: you were not standing exactly on the central axis, or the camera was tilted. Use the grid overlay to check both vertical and horizontal alignment before shooting. Slight corrections are also easy in most editing apps using the crop and straighten tools.
What is the difference between symmetry and a pattern? Symmetry is about a mirror relationship across an axis. A pattern is about repetition of an element across the frame. A tiled floor can be both: the tiles repeat (pattern) and the overall grid might be symmetrical. But a pattern does not have to be symmetrical, and a symmetrical scene does not have to contain a repeating element.
Is breaking the pattern always better than keeping it? Not always. Sometimes the goal is an abstract, textural image where the pattern itself is the whole point and there is no subject breaking it. Other times, a pattern interrupt makes the image immediately more interesting. Look at both options before moving on, and decide which one matches what you want to say with the photo.